Tuesday, April 10, 2012

jewelry organizer: pinterest inspired


Pinterest inspiration+ free wooden-moulding-left-in-a-pile-on-the-street-that-your-neighbor-is-just-throwing-away = adorable jewelry organizer!!!

Thursday, May 27, 2010

Teacher's gifts

2 more days until school is out???? I am in complete denial... I am loving this cooler weather, but it just doesn't seem like summer!

I made these up yesterday for the boys' teachers. I love how they turned out! I am definitely going to have to make another for myself.


Tuesday, May 11, 2010

Thursday, April 22, 2010

Reversible Booster Seat Pad Tutorial


Do you have a crusty booster seat in your car?

Do you have a booster seat for a boy, but need a girly one?

Did your child throw up on his booster seat on the way home from Disneyland and then you washed it and then threw it in the dryer, not thinking it would shrink?

Well, I am so excited to introduce you to my very first tutorial!

I had been brainstorming this one for a few weeks and finally just decided I needed to go for it. It ended up being very easy!

Here's what you need:

old booster seat pad
fabric, enough for 2 sides. They can be the same or matchy matchy.
thread to match


First, remove the tabs on the end of the pad by carefully ripping open the seam, don't just cut them off.


Save these, you need them later. Now take that raw edge that you've just made and zigzag it back together.


Lay your fabrics right side together and lay the pad on top of them. Using your pad as the pattern, cut out the shape of the pad, leaving 1/3 inch extra all the way around for your seam allowance. (Remember, I had to add extra length on mine because it shrunk, that's why it looks so much longer than the pad) You could also trace the shape of the pad and (adding the seam allowance) cut it out.


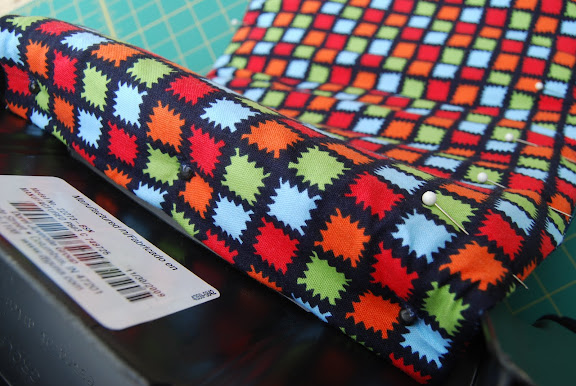
Pin the 2 pieces together and sew 3 sides together leaving the wider end open. Clip the corners and zigzag the raw edges together.


Turn the cover right side out and iron seams. Slide the old cover into place making sure to get it right into place in the corners.


Now remember those holes in the narrow end? You need to secure those and make new holes. I felt with my finger to find where they were and just zigzagged around the hole. Then I made a small slit to secure it back onto the car seat. Sorta like a button hole. See?


You could also do this by hand, but it doesn't need to be perfect, it's not going to show once it's on the base. Sew a topstich on the other side of the holes. This will help relieve some of the tension on those little holes.


Go ahead, try it on and see how it fits. Perfect!


Now grab those tabs you took off the pad and pin them onto the right side of the fabric on one side of the pad .


Now sew them on. Like this:


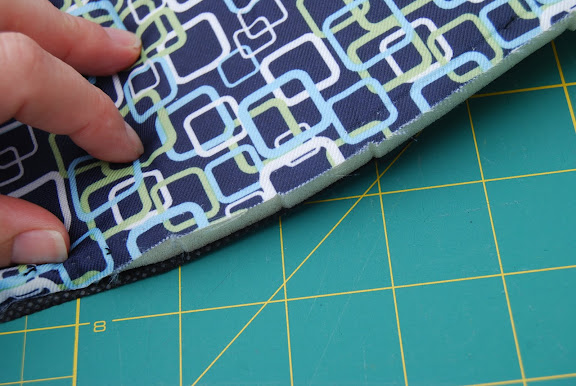
Flip them over so they stick out of the pad and carefully iron, (so as to not melt your tabs) a 1/3 inch seam allowance toward the wrong side of the fabric.


Now pin and sew a topstitch or two (I did two), making sure to secure the edge of the old pad inside* this way if you need to wash it later, it won't get all bunched up inside. And for goodness sakes don't throw it in the dryer. Just let it air dry, trust me!


*if you're lengthening the cover, like I was, take your fingers and feel for the edge of the pad inside the new cover. Secure the edge of the pad with pins and sew a line (shown in the next photo) following the edge.


Now pin your cover around the remaining 3 sides and sew a topstitch to hold everything in place.

You should be done! Place your new pad back on the booster, take a step back to admire your work and pat yourself on the back!

Your feedback is welcome and appreciated, if you happen to notice a mistake or something doesn't make sense, please let me know!
I'm linking to my first Link Parties at Tea Rose Home and Someday Crafts!

Saturday, March 13, 2010

Baby Boy - Shower Gifts

Here are a few baby shower gifts I made this week:

Of course, bibs. I know I always make bibs, but I love them. My pattern and design:


I decided to make a few more things for the little guy so I make the baby chain softie and some wee wee wigwams featured on Make it and Love it. She always has great ideas and easy to understand instructions.


Can you tell I'm loving that green fabric right now? I made a new cover from my ironing board with it, too.

Thursday, February 18, 2010

Binky Patrol Blankets


I signed us up for the Disney program for this year: "Give a day, Get a day:. To earn our tickets, I signed up with the Binky Patrol to make 3 blankets. Ryan paid for the material. I cut and sewed the blankets and Dillon tied them.


I'm not a huge fan of the tied blankets, but it is something that the kids can do to help, so I made 2 that could be tied. For the other one, I used this tutorial for bias tape. I think it looks a little more mature, maybe for a teenage girl. It's not perfect, but it was made with love, I hope the people receiving these blankets can feel that love!


Wednesday, December 23, 2009

Apron Strings


The last of the Christmas gifts that I had to make was started and finished today. the kids watched Christmas movies nearly all morning and into the afternoon while I stitched the day away.

Friday, December 18, 2009

Skirting: the Issue

Check another one off the list, Mama's on a roll!

A request from Miss P., to Santa


Fabric is from JoAnne's, pattern taken from a Target skirt we already had.

Thursday, December 17, 2009

Sewing Mojo


Good thing I made that quilt, because I think I found my sewing mojo!


Checking this off the the list of gifts to make!


Wednesday, December 16, 2009

Procrastinating

here's what i made, when i should have been making christmas presents.


it's a twin size quilt for Miss P. who, by the way, still sleeps in a toddler bed. i know.

i just got the idea in my head and had to do it. right away.

now why can't i seem to do that with my housework!???


i made it using scraps of my favorite fabrics from the past few years. of course it's not finished yet, i need the batting to go on sale at joanne!

Thursday, October 15, 2009

Riiibbit!


While visiting my sister, Heather, in Chicago last week she gave me this adorable collage that she made for Mister Maser. Isn't it cute?!!!
I knew I wanted it to be a frog, since my sister-in-law, Carrie, bought him a stuffed frog when he was born. I e-mailed a few images for inspiration to Heather and this is what she came up with. Adorable! Thanks, Heather!

Friday, October 2, 2009

Aprons for Charity

Well, not charity technically, but for the kids Fall Festival at school. I donated these to the "Country Kitchen" which had fresh baked goods, jam, garden produce, and such. I don't know if they just didn't have any interested parties, but by the end of the night they were still sitting on the table. Maybe I priced them too high. Who knows. Well, I talked to a couple interested ladies and got them SOLD!


Saturday, September 26, 2009

Baby Shower Gift


I cut these out on Friday night and sewed them up Saturday morning before a baby shower. I've made them so many times, that by now they are a cinch to whip up, even last minute! I made up my own pattern and directions, but there are several great tutorials on the web.

Tuesday, September 8, 2009

A Blessing Outfit


This past Sunday we blessed the baby at church. For weeks, no months, before he was born I searched all sorts of fancy boutiques, department stores, chain stores and etsy for something for him to wear, but found nothing. So I decided I had to make something. I wanted something simple and classic with an heirloom quality. I wanted something blue, not white. I don't know why but I have blessed all my boys in blue. I found a great online store that will send you free swatches of fabric. After getting the samples in the mail I picked the color I wanted and went to the fabric store for a pattern. I don't know if it was me or the pattern, but I had a hard time with some of the directions, so I'm not sure if I made it right, but it works. I love how it turned out!

Friday, September 4, 2009

ReCycle / ReUse

When I had my first child I bought a used Jenny Lind crib for a mere $20. It lasted for the next 2 kids until my daughter kicked the side and broke a spindle. I actually duct taped it back together until she moved out of it a few months later. I know, ghetto, but I wasn't ready to move her out quite yet. As I was dissembling it I was looking at it wondering if there was something useful I could do with it. I saved a side and stuck it in the garage with the rest of my projects until I thought of something I could make with it. So here it is: a blanket rack.


I need to give it a fresh coat of paint, but I was so excited to get it hung up, I couldn't wait!

Here's what I did:

I cut a section of the side to include 7 rungs. I thought this looked like a good size. Next I cut small blocks to mount on the back so that it hung away from the wall. This gives the blankets room to hang in the back. Finally I got some ring hangers and attached them to the back.

I love that I made something useful out of "junk", but I also love it because that crib was a little sentimental to me and now I can think of my babies when I look at it!

Wednesday, September 2, 2009

projects!

Finally feeling better from the flu we had last week! I had a few projects that I wanted to do and finally had the time, motivation and energy to get them done.


The first is a onesie for my soon to be born niece. At my SIL's baby shower they passed out a white onesie and asked us to decorate them, but all they had were fabric markers! Well, being the crafty snob that I am, I sat there thinking about all the cute things I could do with it if I was at home with all my supplies. I decided I would politely let her know I would do it at home and give it to her later, using the baby as my excuse, because I couldn't really be expected to produce something whilst nursing my baby, right? Well, they were on to me... I am a craft snob and they knew it! We had a good laugh about that!


The next one was freezer paper stencils. I have been wanting to try this one and have had the stuff for a while, but kept putting it off. It was so easy and quick!

My daughter has been obsessed with Mary Poppins lately and when I saw this image while looking for Mary Poppins costumes on the internet I knew I had to try it. It will be perfect for our Disneyland trip!


The last project was a blanket that I had gotten in the free diaper bag from the hospital. I love the jersey knit blanket, great for wrapping him into a little burrito! But it had the hospital name on the corner and I just didn't like it. So I made up a little applique with his initial on it. Here's the before:


Here's the after:


I have really missed being creative these last few weeks and now I have tons of motivation to get some of my other projects done, let's hope it lasts!

Friday, July 10, 2009

Nesting

I have not felt very creative lately, my excuse is I've been creating the ultimate crafty project: a baby. Now that I'm 2 weeks from delivery, I've felt the need to prepare for this child to join our family. That means cleaning, gathering essentials, getting the room ready (he'll be sharing with Miss P), and a little project I've been wanting to do. I guess you could say, I'm nesting.


The pattern for the bird can be found here.

Friday, April 3, 2009

Shirt Applique


I am working on this shirt for our friends son, who loves trucks. We're off to visit them for a few days and I wanted to bring him something. I hope he likes it!


It was easy to do and very inexpensive, just your standard T-shirt, fabric scrap, and some Wonder-under. (I love that stuff!) I have been wanting to do some shirts for the kids and this was good practice. O-Dog has now requested a shirt with a big 4 on it.

Tuesday, March 31, 2009

Morning photos


I took these pictures the other morning. I love these grape hyacinth, I wish they lasted longer as they are already drying up and disapearing.


I just happened to notice 3 butterflies hanging around them and grabbed my camera to snap a few. I could actually see their little "tongue" going in and out sipping the nectar of the flowers.