Showing posts with label Sewing. Show all posts

Thursday, April 22, 2010

Reversible Booster Seat Pad Tutorial


Do you have a crusty booster seat in your car?

Do you have a booster seat for a boy, but need a girly one?

Did your child throw up on his booster seat on the way home from Disneyland and then you washed it and then threw it in the dryer, not thinking it would shrink?

Well, I am so excited to introduce you to my very first tutorial!

I had been brainstorming this one for a few weeks and finally just decided I needed to go for it. It ended up being very easy!

Here's what you need:

old booster seat pad
fabric, enough for 2 sides. They can be the same or matchy matchy.
thread to match


First, remove the tabs on the end of the pad by carefully ripping open the seam, don't just cut them off.


Save these, you need them later. Now take that raw edge that you've just made and zigzag it back together.
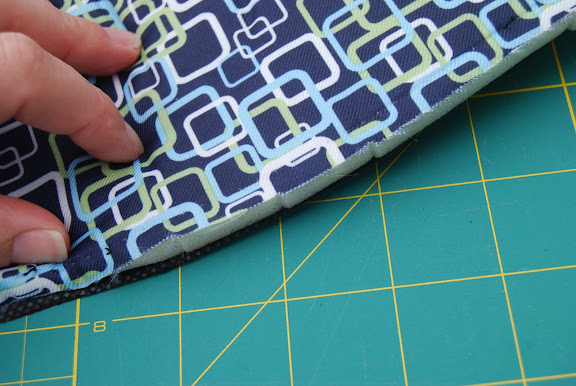


Lay your fabrics right side together and lay the pad on top of them. Using your pad as the pattern, cut out the shape of the pad, leaving 1/3 inch extra all the way around for your seam allowance. (Remember, I had to add extra length on mine because it shrunk, that's why it looks so much longer than the pad) You could also trace the shape of the pad and (adding the seam allowance) cut it out.


Pin the 2 pieces together and sew 3 sides together leaving the wider end open. Clip the corners and zigzag the raw edges together.


Turn the cover right side out and iron seams. Slide the old cover into place making sure to get it right into place in the corners.


Now remember those holes in the narrow end? You need to secure those and make new holes. I felt with my finger to find where they were and just zigzagged around the hole. Then I made a small slit to secure it back onto the car seat. Sorta like a button hole. See?


You could also do this by hand, but it doesn't need to be perfect, it's not going to show once it's on the base. Sew a topstich on the other side of the holes. This will help relieve some of the tension on those little holes.


Go ahead, try it on and see how it fits. Perfect!
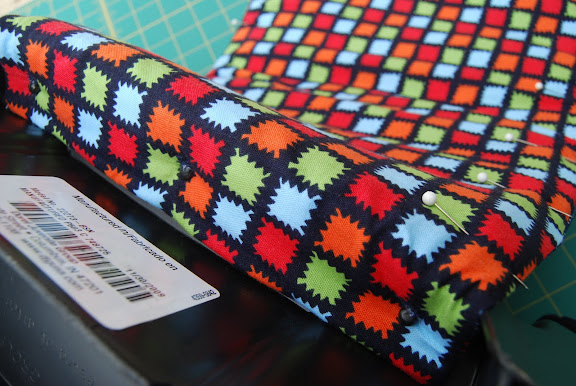


Now grab those tabs you took off the pad and pin them onto the right side of the fabric on one side of the pad .


Now sew them on. Like this:


Flip them over so they stick out of the pad and carefully iron, (so as to not melt your tabs) a 1/3 inch seam allowance toward the wrong side of the fabric.


Now pin and sew a topstitch or two (I did two), making sure to secure the edge of the old pad inside* this way if you need to wash it later, it won't get all bunched up inside. And for goodness sakes don't throw it in the dryer. Just let it air dry, trust me!


*if you're lengthening the cover, like I was, take your fingers and feel for the edge of the pad inside the new cover. Secure the edge of the pad with pins and sew a line (shown in the next photo) following the edge.


Now pin your cover around the remaining 3 sides and sew a topstitch to hold everything in place.

You should be done! Place your new pad back on the booster, take a step back to admire your work and pat yourself on the back!

Your feedback is welcome and appreciated, if you happen to notice a mistake or something doesn't make sense, please let me know!
I'm linking to my first Link Parties at Tea Rose Home and Someday Crafts!

Saturday, March 13, 2010

Baby Boy - Shower Gifts

Here are a few baby shower gifts I made this week:

Of course, bibs. I know I always make bibs, but I love them. My pattern and design:


I decided to make a few more things for the little guy so I make the baby chain softie and some wee wee wigwams featured on Make it and Love it. She always has great ideas and easy to understand instructions.


Can you tell I'm loving that green fabric right now? I made a new cover from my ironing board with it, too.

Saturday, September 26, 2009

Baby Shower Gift


I cut these out on Friday night and sewed them up Saturday morning before a baby shower. I've made them so many times, that by now they are a cinch to whip up, even last minute! I made up my own pattern and directions, but there are several great tutorials on the web.

Friday, April 3, 2009

Shirt Applique


I am working on this shirt for our friends son, who loves trucks. We're off to visit them for a few days and I wanted to bring him something. I hope he likes it!


It was easy to do and very inexpensive, just your standard T-shirt, fabric scrap, and some Wonder-under. (I love that stuff!) I have been wanting to do some shirts for the kids and this was good practice. O-Dog has now requested a shirt with a big 4 on it.

Wednesday, March 4, 2009

Telling the tooth

My Church is involved in the Festival of Trees again and have asked for donations of handmade items to be sold so I decided to put my collection of scraps to good use. I came up with these little tooth fairy pillows.

DSC_0170


DSC_0166

Learning Curve

A while back I was asked to do some upholstery work for some family-of-family (you know like a friend-of-a-friend deal). Something I have never done before: 4 cushion slipcovers with piping and zippers. I had the existing seat cushions, but the back part, I had to make from scratch. I took apart one of the existing slipcovers to make a pattern from it, and left the other one to be able to go back and look at the construction of it.


Did I mention it was velvet? It's very hard to sew with, because it's very easily crushed and once it's crushed ...it's crushed, you can't undo crushed velvet. So you get this mottled look on the fabric.

Oh, and the piping? I had never made piping before. That part was okay, but then getting it to look right once I got the whole thing together was a challenge. After ripping apart the puckered seams for the 10th time, I was nearly in tears and beginning to foam at the mouth. Deep breath. Little prayer. Calm.

When I let my mind think about the entire project ahead of me, I started to stress out, but if I just thought about one small step at a time, It was okay. And prayer, ....prayer helps everything - yes, even sewing! (My mom taught me that!)Well, as soon as I finished the first slipcover I fit it onto the cushion and when I went to zip it up....pop! The zipper broke.

GARBAGE! (that's my dad's favorite swear word.)

For a first timer, I think they turned out relatively well. (As long as you don't examine the zippers in the back too closely! After starting the project I noticed that the fabric was quite faded in some areas, thankfully my client didn't mind and thought it gave the pieces a vintage feel. She was happy with them and in the end, that's what's important.


Chore Chart

I have had several projects that I wanted to get check off my to-do list and here's one of them. My Sis-in-Law, Carrie, works at Tricks gym, as the assistant teacher in their CampUs classes. She is amazing with kids! She is one of those women who know just what to say to a kid to snap them out of a funk or stop a meltdown before it starts. I know it's selfish, but I'm sometimes glad she doesn't have kids yet, because if she did, who would help me with mine!!!???? Someday she is going to be an amazing mom. So recently, she came to me with an idea for a chore chart for their class, but didn't know how to make it happen. So we worked together and with the help of my trusty sewing machine, we did it!

She started with scrapbook paper, cut to size and laminated to make a small board. We went to the fabric store and picked up some clear vinyl, which we cut into rectangles. I stitched the vinyl rectangles onto the board to make pockets. She already had little cards with the classroom jobs on them, which fit into the little windows. She has wooden tiles with the students names on them which will be stuck under each window with velcro so they can rotate them each week. They can remove the job cards or change them as needed.

DSC_0429

DSC_0428

Sounds easy right? Well I had to cut out 36 rectangles out of the vinyl, sew 6 rectangles onto each board (6 different boards), with double stitching on each rectangle and single stitch around the perimeter of the board to finish it off. Then I had to pull all the hanging threads back thru to the back of the board and tape them all down.

If you live in the Sacramento area, check out Tricks for gym, dance CampUs and swimming too!

Oh Baby!

I had a baby shower to go to and being the procrastinator that I am, I didn't even think about the gift until the afternoon of the party. (Even though I had been to Target at least 5 times after recieving the invitation in the mail!) I am terrible about that! I decided to go to my stash of baby bibs, but wasn't really happy with the selection I had on hand. I decided to try and sew up a couple before I had to leave.

I am especially pleased with how the cherry one turned out. I made a little girl's apron with the same fabrics last year so the bib was made with the scraps from that project. I just love the color combination.

Bibs

I already had this one made, so I added it in the gift too.

IMG_1358

My Process

I had an order for 2 aprons so last week I quickly put together some new designs and just love how they turned out! I thought I would share my process for designing an apron. I like to start with a base fabric and 2-3 simple complimenting fabrics. I was given free reign on color choices and pattern.

DSC_0122

Most of the fabric I use is purchased at JoAnne Fabrics, but when I can't find something that inspires my project, I check out the quilt stores, they usually have a wider selection and carry more of the "designer" fabrics. After I gather the fabrics for the project, I sit down to sketch out a design. When I'm happy with the design, I decide which fabrics I will use where and add in a rough sketch of the fabric so I can get a visual of what it will look like.

DSC_0126

I start cutting out each piece in it's chosen fabric. I didn't use a pattern for this one, I just made it up as I went. I cut as much as I can using my rotary cutter and mat, it goes much quicker than with scissors.

DSC_0127

After all the pieces are cut out, In my mind, I seperate the piece into 3 sections: bodice, torso, and skirt. Sometime I have to write out each step of the process so I don't forget to do something and have to rip out a seam. (For this apron I was going to add a loop to hang a dish towel on, but I forgot to add it to my steps. Oops! By the time I remembered, it was too late!) I complete one section at a time and when they're all done, I sew them together.

Here's the finished product:


DSC_0069

Sometimes when I am in the middle of sewing a project I tweak the fabric choice a bit or add a little something. Here, I switched the pocket to the other side and I think I switched the neck ties fabric. I also came up with this pocket detailing from one of my favorite shirts that has this ruffle all the way down the front. It's so simple, but I love it.

DSC_0070

Here's an upclose view of the front:

Do you see that little piece of red thread sitting there. It's bugging the heck out of me, I just wanna reach my hand through the monitor and pick it off! Ugh!

DSC_0071


So there you have it! It's probably not the normal process of a pattern designer, but it works for me!

Here's the other half of that apron order:


DSC_0037

DSC_0038

Thanks to my sistas to being such fabulous models!

Apron Giveaway Winner

I made this apron for a giveaway I had on my other blog. Jessica, the lucky winner, came over and picked out the base fabrics and then I played with the design a bit. I have made several aprons now and was feeling confident enough this time to forgo a pattern. I changed up the front and the neck ties, and added a pocket. All my own design! The entire thing is fully lined.

I went for a "scrappy" look with the neck ties:

DSC_0339

Pintuck detailing on the bodice:

DSC_0317

Added a pocket on one side:

DSC_0325

I love the how colors and patterns look together on the bottom ruffle!

DSC_0323

A new apron for me.

I have made several aprons for friends, but never for myself so I decided it was time for a new apron! I like how it turned out!

DSC_000277

DSC_0016

DSC_0021